y China Gadgets Reviews: nexus
Showing posts with label nexus. Show all posts

Jun 15, 2016

Download Nexus Root Toolkit 2.1.6


Download Nexus Root Toolkit 2.1.6 from here, here or here. (43 MB - NRT_v2.1.6.sfx). You can download previous version 2.1.4 from here.


Unlocking, rooting, relocking and unrooting simplified! (and much more!)

VERSION 2.1.6 - This program will automatically bring together all the files you need to unlock and root your device in a few clicks, or flash it back to stock and re-lock it. You can also use this program to backup/restore all your important data, flash zips, set file permissions, push and pull files, install apps, generate logcats/bugreports, and much more! With the included file association options, you can perform tasks like flashing zips, installing apps, restoring android backup files, and flashing/booting img files with just a double click! The program includes a full featured interface for automating tasks in TWRP, enhanced restore features, an in-built auto-updater/notification system, ‘any build’ mode, advanced restore features,’NRT- Live Log’ for viewing the adb/fastboot cmds that are run in the background, quick tools utilities, and tools for taking screenshots/screen-recordings.   All the latest official Android builds and Nexus devices are supported.  The program intelligently and selectively downloads the files it needs for your device and makes sure you are using the latest files available.  The program can even auto-detect your device and build.  This release brings numerous optimizations, full android N-preview support, full Pixel C support, and support for all the latest Marshmallow builds. 


Supported Nexus devices:
· Galaxy Nexus: GSM Models (both yakju and non-yakju builds)
· Galaxy Nexus: CDMA/LTE Verizon Models
· Galaxy Nexus: CDMA/LTE Sprint Models
· Nexus S: Worldwide, i9020t and i9023 Models
· Nexus S: 850MHz, i9020a Models
· Nexus S: Korea, m200 Models
· Nexus S 4G: d720 Models
· Nexus 7: Asus Tablet
· Nexus 7 3G: Asus Tablet
· Nexus 7 v2 (2013): Asus Tablet
· Nexus 7 v2 (2013) LTE: Asus Tablet
· Nexus 10: Samsung Tablet
· Nexus 4: LG Phone
· Nexus 5: LG Phone
· Nexus 5X: LG Phone
· Nexus 9: HTC Wifi Tablet
· Nexus 9: HTC LTE Tablet
· Nexus 6: Motorola Phone
· Nexus 6P: Huawei Phone
· Nexus Player: Google Device
· Nexus Pixel C: Google Tablet

Instructions:
1. Select the correct device and build (what you are currently running)
2. Configure your drivers if you haven’t already using the driver guide (If you aren’t sure use Step 3 of the driver guide to test your drivers).
3. If you need to, backup your important data.
4. Unlock your device
5. Root your device
6. Enjoy! ^_^
  • Learn more about each option by mousing over the control, dynamic tooltips will provide you more information, also each button displays a message about what it does first.
  • So the best way to get familiar with the toolkit is simply to press the buttons and read what it says.

What’s new in Nexus Root Toolkit 2.1.6: June 13th, 2016
· Pixel C fully supported.
· Android N-Preview fully supported.
· Device encryption status detection.
· Updated root flow for devices which require decryption before TWRP will boot properly.
· Updated flashstock.bat to automatically revert to Fastboot erase cmd if Fastboot format cmd generates the ‘Formatting not supported’ error due to f2fs.
· Latest SDK dev android platform tools utilized
· Bug fix: cancelling the zip flash confirmation in advanced utilities will now properly halt the operation.
· Bug fix: ‘About NRT’ is properly working again.
· General optimizations, code improvements and bugfixes.


via www.wugfresh.com

Jan 18, 2016

Download Nexus Root Toolkit 2.1.4


Download Nexus Root Toolkit 2.1.4 from here, here or here. (52 MB - NRT_v2.1.4.sfx). You can download previous version 2.1.3 from here.


Unlocking, rooting, relocking and unrooting simplified! (and much more!)

VERSION 2.1.4 - This program will automatically bring together all the files you need to unlock and root your device in a few clicks, or flash it back to stock and re-lock it. You can also use this program to backup/restore all your important data, flash zips, set file permissions, push and pull files, install apps, generate logcats/bugreports, and much more! With the included file association options, you can perform tasks like flashing zips, installing apps, restoring android backup files, and flashing/booting img files with just a double click! The program includes a full featured interface for automating tasks in TWRP, enhanced restore features, an in-built auto-updater/notification system, ‘any build’ mode, advanced restore features,’NRT- Live Log’ for viewing the adb/fastboot cmds that are run in the background, quick tools utilities, and tools for taking screenshots/screen-recordings.   All the latest official Android builds and Nexus devices are supported.  The program intelligently and selectively downloads the files it needs for your device and makes sure you are using the latest files available.  The program can even auto-detect your device and build.  This release brings robust enhancements to all adb push/pull operations with extra verifications, bug fixes, flash stock optimizations, and Marshmallow root support – plus extended support to the Nexus 5X, 6P and Player.  


Supported Nexus devices:
· Galaxy Nexus: GSM Models (both yakju and non-yakju builds)
· Galaxy Nexus: CDMA/LTE Verizon Models
· Galaxy Nexus: CDMA/LTE Sprint Models
· Nexus S: Worldwide, i9020t and i9023 Models
· Nexus S: 850MHz, i9020a Models
· Nexus S: Korea, m200 Models
· Nexus S 4G: d720 Models
· Nexus 7: Asus Tablet
· Nexus 7 3G: Asus Tablet
· Nexus 7 v2 (2013): Asus Tablet
· Nexus 7 v2 (2013) LTE: Asus Tablet
· Nexus 10: Samsung Tablet
· Nexus 4: LG Phone
· Nexus 5: LG Phone
· Nexus 5X: LG Phone
· Nexus 9: HTC Wifi Tablet
· Nexus 9: HTC LTE Tablet
· Nexus 6: Motorola Phone · Nexus 6P: Huawei Phone · Nexus Player: Google Device

Instructions:
1. Select the correct device and build (what you are currently running)
2. Configure your drivers if you haven’t already using the driver guide (If you aren’t sure use Step 3 of the driver guide to test your drivers).
3. If you need to, backup your important data.
4. Unlock your device
5. Root your device
6. Enjoy! ^_^
  • Learn more about each option by mousing over the control, dynamic tooltips will provide you more information, also each button displays a message about what it does first.
  • So the best way to get familiar with the toolkit is simply to press the buttons and read what it says.

What’s new in Nexus Root Toolkit 2.1.4: January 16th, 2016
· Extended the default wait time for adb recovery device detection.


via www.wugfresh.com

Jan 14, 2016

Download Nexus Root Toolkit 2.1.3


Download Nexus Root Toolkit 2.1.3 from here, here or here. (52 MB - NRT_v2.1.3.sfx). You can download previous version 2.1.0 from here.


Unlocking, rooting, relocking and unrooting simplified! (and much more!)

VERSION 2.1.3 - This program will automatically bring together all the files you need to unlock and root your device in a few clicks, or flash it back to stock and re-lock it. You can also use this program to backup/restore all your important data, flash zips, set file permissions, push and pull files, install apps, generate logcats/bugreports, and much more! With the included file association options, you can perform tasks like flashing zips, installing apps, restoring android backup files, and flashing/booting img files with just a double click! The program includes a full featured interface for automating tasks in TWRP, enhanced restore features, an in-built auto-updater/notification system, ‘any build’ mode, advanced restore features,’NRT- Live Log’ for viewing the adb/fastboot cmds that are run in the background, quick tools utilities, and tools for taking screenshots/screen-recordings.   All the latest official Android builds and Nexus devices are supported.  The program intelligently and selectively downloads the files it needs for your device and makes sure you are using the latest files available.  The program can even auto-detect your device and build.  This release brings robust enhancements to all adb push/pull operations with extra verifications, bug fixes, flash stock optimizations, and Marshmallow root support – plus extended support to the Nexus 5X, 6P and Player.  


Supported Nexus devices:
· Galaxy Nexus: GSM Models (both yakju and non-yakju builds)
· Galaxy Nexus: CDMA/LTE Verizon Models
· Galaxy Nexus: CDMA/LTE Sprint Models
· Nexus S: Worldwide, i9020t and i9023 Models
· Nexus S: 850MHz, i9020a Models
· Nexus S: Korea, m200 Models
· Nexus S 4G: d720 Models
· Nexus 7: Asus Tablet
· Nexus 7 3G: Asus Tablet
· Nexus 7 v2 (2013): Asus Tablet
· Nexus 7 v2 (2013) LTE: Asus Tablet
· Nexus 10: Samsung Tablet
· Nexus 4: LG Phone
· Nexus 5: LG Phone
· Nexus 5X: LG Phone
· Nexus 9: HTC Wifi Tablet
· Nexus 9: HTC LTE Tablet
· Nexus 6: Motorola Phone · Nexus 6P: Huawei Phone · Nexus Player: Google Device

Instructions:
1. Select the correct device and build (what you are currently running)
2. Configure your drivers if you haven’t already using the driver guide (If you aren’t sure use Step 3 of the driver guide to test your drivers).
3. If you need to, backup your important data.
4. Unlock your device
5. Root your device
6. Enjoy! ^_^
  • Learn more about each option by mousing over the control, dynamic tooltips will provide you more information, also each button displays a message about what it does first.
  • So the best way to get familiar with the toolkit is simply to press the buttons and read what it says.

What’s new in Nexus Root Toolkit 2.1.3: January 13th, 2016
· Fixed the unlock function – commented out test function.


via www.wugfresh.com

Nov 23, 2015

Download Nexus Root Toolkit 2.1.0


Download Nexus Root Toolkit 2.1.0 from here, here or here. (52 MB - NRT_v2.1.0.sfx). You can download previous version 2.0.7 from here.


Unlocking, rooting, relocking and unrooting simplified! (and much more!)

VERSION 2.1.0 - This program will automatically bring together all the files you need to unlock and root your device in a few clicks, or flash it back to stock and re-lock it. You can also use this program to backup/restore all your important data, flash zips, set file permissions, push and pull files, install apps, generate logcats/bugreports, and much more! With the included file association options, you can perform tasks like flashing zips, installing apps, restoring android backup files, and flashing/booting img files with just a double click! The program includes a full featured interface for automating tasks in TWRP, enhanced restore features, an in-built auto-updater/notification system, ‘any build’ mode, advanced restore features,’NRT- Live Log’ for viewing the adb/fastboot cmds that are run in the background, quick tools utilities, and tools for taking screenshots/screen-recordings.   All the latest official Android builds and Nexus devices are supported.  The program intelligently and selectively downloads the files it needs for your device and makes sure you are using the latest files available.  The program can even auto-detect your device and build.  This release brings robust enhancements to all adb push/pull operations with extra verifications, bug fixes, flash stock optimizations, and Marshmallow root support – plus extended support to the Nexus 5X, 6P and Player.  


Supported Nexus devices:
· Galaxy Nexus: GSM Models (both yakju and non-yakju builds)
· Galaxy Nexus: CDMA/LTE Verizon Models
· Galaxy Nexus: CDMA/LTE Sprint Models
· Nexus S: Worldwide, i9020t and i9023 Models
· Nexus S: 850MHz, i9020a Models
· Nexus S: Korea, m200 Models
· Nexus S 4G: d720 Models
· Nexus 7: Asus Tablet
· Nexus 7 3G: Asus Tablet
· Nexus 7 v2 (2013): Asus Tablet
· Nexus 7 v2 (2013) LTE: Asus Tablet
· Nexus 10: Samsung Tablet
· Nexus 4: LG Phone
· Nexus 5: LG Phone
· Nexus 5X: LG Phone
· Nexus 9: HTC Wifi Tablet
· Nexus 9: HTC LTE Tablet
· Nexus 6: Motorola Phone · Nexus 6P: Huawei Phone · Nexus Player: Google Device

Instructions:
1. Select the correct device and build (what you are currently running)
2. Configure your drivers if you haven’t already using the driver guide (If you aren’t sure use Step 3 of the driver guide to test your drivers).
3. If you need to, backup your important data.
4. Unlock your device
5. Root your device
6. Enjoy! ^_^
  • Learn more about each option by mousing over the control, dynamic tooltips will provide you more information, also each button displays a message about what it does first.
  • So the best way to get familiar with the toolkit is simply to press the buttons and read what it says.

What’s new in Nexus Root Toolkit 2.1.0: November 22th, 2015
· Bug fixes.
· Latest Masterlists included.
· Flashstock revisions.
· Revised and improved dynamic adb operation timeout functions.


via www.wugfresh.com

Nov 22, 2015

Download Nexus Root Toolkit 2.0.7


Download Nexus Root Toolkit 2.0.7 from here, here or here
You can download previous version 2.0.6 from here.


Unlocking, rooting, relocking and unrooting simplified! (and much more!)

VERSION 2.0.7 - This program will automatically bring together all the files you need to unlock and root your device in a few clicks, or flash it back to stock and re-lock it. You can also use this program to backup/restore all your important data, flash zips, set file permissions, push and pull files, install apps, generate logcats/bugreports, and much more! With the included file association options, you can perform tasks like flashing zips, installing apps, restoring android backup files, and flashing/booting img files with just a double click! The program includes a full featured interface for automating tasks in TWRP, enhanced restore features, an in-built auto-updater/notification system, ‘any build’ mode, advanced restore features,’NRT- Live Log’ for viewing the adb/fastboot cmds that are run in the background, quick tools utilities, and tools for taking screenshots/screen-recordings.   All the latest official Android builds and Nexus devices are supported.  The program intelligently and selectively downloads the files it needs for your device and makes sure you are using the latest files available.  The program can even auto-detect your device and build.  This release brings robust enhancements to all adb push/pull operations with extra verifications, bug fixes, flash stock optimizations, and Marshmallow root support – plus extended support to the Nexus 5X, 6P and Player.  


Supported Nexus devices:
· Galaxy Nexus: GSM Models (both yakju and non-yakju builds)
· Galaxy Nexus: CDMA/LTE Verizon Models
· Galaxy Nexus: CDMA/LTE Sprint Models
· Nexus S: Worldwide, i9020t and i9023 Models
· Nexus S: 850MHz, i9020a Models
· Nexus S: Korea, m200 Models
· Nexus S 4G: d720 Models
· Nexus 7: Asus Tablet
· Nexus 7 3G: Asus Tablet
· Nexus 7 v2 (2013): Asus Tablet
· Nexus 7 v2 (2013) LTE: Asus Tablet
· Nexus 10: Samsung Tablet
· Nexus 4: LG Phone
· Nexus 5: LG Phone
· Nexus 5X: LG Phone
· Nexus 9: HTC Wifi Tablet
· Nexus 9: HTC LTE Tablet
· Nexus 6: Motorola Phone · Nexus 6P: Huawei Phone · Nexus Player: Google Device

Instructions:
1. Select the correct device and build (what you are currently running)
2. Configure your drivers if you haven’t already using the driver guide (If you aren’t sure use Step 3 of the driver guide to test your drivers).
3. If you need to, backup your important data.
4. Unlock your device
5. Root your device
6. Enjoy! ^_^
  • Learn more about each option by mousing over the control, dynamic tooltips will provide you more information, also each button displays a message about what it does first.
  • So the best way to get familiar with the toolkit is simply to press the buttons and read what it says.

What’s new in Nexus Root Toolkit 2.0.7: November 18th, 2015
· Bug fixes.
· New builds supported.
· Revised root flow for dealing with current bootloader bug in Nexus 5x devices which prevents fastboot boot command from working properly.
· Built root kernels using chainfires original (more stable, not the systemless root) method for all the new builds.
· New information and warning prompts.
· Rebuilt no-force encrypt images.
· Stability improvements.


via www.wugfresh.com

Jul 10, 2015

3500 mAh high density battery for Nexus 4? Yeah, right!


As you can read in this article, last year I bought a new regular 2100 mAh battery for my Nexus 4 - LG E960 smartphone, it costed me only a few bucks (9.73 USD exactly)

This week I bought another one, just for my curiosity, from here, but this time a 3500 mAh high density battery, and I paid US $10.49 for it! 

I just installed it inside my phone and run then CPU-Z to find the real capacity. And guess what? ;) :) Take a look at this printscreen:

Don’t miss any of our future video tutorials, follow us on Youtube. Like us on Facebook. Add us in your circles on Google+. Watch our photo albums on Flickr. Subscribe now to our newsletter.

Apr 14, 2015

Download Android Lollipop 5.1 OTA update file for Google Nexus 4 smartphone


Download Android Lollipop 5.1 OTA update file for Google Nexus 4 smartphone from here, here, here or here.


Firmware details
Archive name: Google Nexus 4 LMY47O 5.1 OTA update
Image: e6789b4e57176ed28cd8b24747c134366b3908fc.signed-occam-LMY47O-from-LRX22C.e6789b4e
Archive file size: 174 MB
Support: Snapdragon S4 Pro
Build number: LMY47O


Caution: Please do not update firmware unless you know what you are doing, you really want it or it is absolutely necessary. Firmware updates may occasionally have bad results, like bricking your device, temporarily or permanently. The firmware update process is done entirely at your own risk. Before attempting to update the firmware, back up your data. 


Don’t miss any of our future video tutorials, follow us on Youtube. Like us on Facebook. Add us in your circles on Google+. Watch our photo albums on Flickr. Subscribe now to our newsletter.

Nov 15, 2014

Photo Gallery: Stock Lollipop @ Nexus 4 smartphone


No need to wait for OTA update for Nexus devices, just follow this tutorial and you will officially Lollipop device your site. 


Jun 21, 2014

How to install KitKat 4.4.4 on your Nexus device without waiting for Google OTA Update


First of all just download Nexus Root Toolkit 1.8.3 from here, here or here. Install it, run it and select your Nexus model type. Download KitKat 4.4.4 (KTU84P) image file from here https://developers.google.com/android/nexus/images
Enable 'USB Debugging' on your device, then choose 'Flash Stock + Unroot' and select 'Other/Browse...' + 'I downloaded a factory image...'. Choose TU84P image file. Follow the onscreen instruction and that's all.

Important: this upgrade will wipe all user data, so better make a back-up first.

Successfully tested earlier today on my Google Nexus 4 LG 960.


About KitKat 4.4.4
Android 4.4.4 is a security update, which addresses issues within the Open SSL protocol. That was the code behind the Heartbleed bug, which caused major security headaches across the Internet in April. Sprint Corp. (NYSE:S), which carries the Nexus 5, has also confirmed that the update fixes various security issues.


This program will automatically bring together all the files you need to unlock and root your device in a few clicks, or flash it back to stock and re-lock it. You can also use this program to backup/restore all your important data, flash zips, set file permissions, push and pull files, install apps, generate logcats/bugreports, and much more! With the included file association options, you can perform tasks like flashing zips, installing apps, restoring android backup files, and flashing/booting img files with just a double click! The program includes a full featured interface for automating tasks in TWRP, enhanced restore features, an in-built auto-updater/notification system, ‘any build’ mode, advanced restore features,’NRT- Live Log’ for viewing the adb/fastboot cmds that are run in the background, quick tools utilities, and tools for taking screenshots/screen-recordings.   All the latest Android builds and Nexus devices are officially supported including the new Nexus 5, with full KitKat support for all the newly upgraded devices.  The program intelligently and selectively downloads the files it needs for your device and makes sure you are using the latest files available.  The program can even auto-detect your device and build.  The main changes in this release are full 4.4.3 support, improvements to the updater, fixes to the Philz Advanced Recovery integration, and general code enhancements and optimizations. 

Supported Nexus devices:
· Galaxy Nexus: GSM Models (both yakju and non-yakju builds)
· Galaxy Nexus: CDMA/LTE Verizon Models
· Galaxy Nexus: CDMA/LTE Sprint Models
· Nexus S: Worldwide, i9020t and i9023 Models
· Nexus S: 850MHz, i9020a Models
· Nexus S: Korea, m200 Models
· Nexus S 4G: d720 Models
· Nexus 7: Asus Tablet
· Nexus 7 3G: Asus Tablet
· Nexus 7 v2 (2013): Asus Tablet
· Nexus 7 v2 (2013) LTE: Asus Tablet
· Nexus 10: Samsung Tablet
· Nexus 4: LG Phone
· Nexus 5: LG Phone


Instructions:
1. Select the correct device and build (what you are currently running)
2. Configure your drivers if you haven’t already using the driver guide (If you aren’t sure use Step 3 of the driver guide to test your drivers).
3. If you need to, backup your important data.
4. Unlock your device
5. Root your device
6. Enjoy! ^_^
  • Learn more about each option by mousing over the control, dynamic tooltips will provide you more information, also each button displays a message about what it does first.
  • So the best way to get familiar with the toolkit is simply to press the buttons and read what it says

Jun 9, 2014

Wi-Fi Fix for latest Franco Kernel 3.4.88 #208 on Nexus 4


By default the Wi-Fi isn't working on Nexus 4 with KitKat 4.4.3 stock firmware, with the latest Franco Kernel 3.4.88 #208. Download the Wi-Fi Fix from here, here or here. The archive contains 2 files: 4.4.3_Wifi_Fix.zip and Revert_4.4.3_Wifi_Fix.zip. 

To fix the Wi-Fi not working for Kernel Franco 3.4.88 #208 on Nexus 4, just copy 4.4.3_Wifi_Fix.zip file to your phone via USB cable, then go to recovery and flash the zip. If somehow you want to undone that, flash from recovery
Revert_4.4.3_Wifi_Fix.zip and you're done.

To install recovery on your Nexus 4 just download Nexus Root Toolkit 1.8.3 from here, unlock your phone, then root it and install TWRP v2.7.0.0. Use 'Quick Boot' to easily boot into TWRP. To flash the latest Franco Kernel on your Nexus device use Franco Kernel Updater from Play Store. (your device must to be rooted).

Jun 7, 2014

How to maximize and optimize battery life on Google Nexus 4 - LG E960


Choose from the options bellow only what is ok for you and your phone.

1. Lower the screen brightness
The brightness of the screen is likely the number one battery killer. If you would like to increase the battery life of your phone, the first thing that you should consider is lowering the screen brightness. This single action will likely have the most impact on the battery life of your Nexus 4. If you are hoping to get more than a day’s worth of battery life, you should set your brightness to “Auto brightness” or to a lower manual setting.

2. Minimize LTE/Bluetooth/GPS/NFC/Wifi usage. 
Disable NFC and Bluetooth by default permanently, just enable when you used it. After the screen brightness, network connectivity probably takes up the most battery. LTE uses more battery than 3G and 3G uses more battery than 2G, but we’re going to leave LTE enabled–as the phone should still be enjoyable to use. There’s no point in buying a high end phone if you’re going to disable everything that makes it enjoyable or useful. Nevertheless, if you don’t currently need it, leave Bluetooth, GPS, NFC and Wifi off. NFC allows you to transfer files to other phones by placing the phones back to back. However, at this point in time, NFC has limited uses, therefore to turn it off, go into “Settings” then “More…” and uncheck “NFC”.

3. Disable Google Now
Google Now is kinda neat, but it’s always searching for things to show you, so you can save some battery by disabling it. We don’t use it very often, so we won’t miss it. You can disable Google Now by swiping up with the desktop with two fingers. Click on “…”, select “Settings”, select “Google Now”, toggle “On” until it switches to “Off”.

4. Enable Airplane Mode in radio dead zones
If you’re in an area that has poor or no reception, you can consider enabling Airplane mode. The weaker the cell reception, the more effort your phone has to put in to try to lock onto a signal, thus the more battery is consumed. An example of airplane mode usage, if you’re going to spend the next hour in a subway with no cell phone reception, you can put your phone in Airplane mode during the commute so that it stops trying to lock onto a cell tower for the next hour. Also, if you sit in an office all day and you have poor cell reception there, that may cause a lot of battery usage. There’s not much you can do about getting a weak signal in the office, but you should know that it’s a factor.

5. Monitor battery usage
When you’re trying to increase the battery life of your phone, one of the first things that you need to do is figure out what is consuming the most energy. Install an app such as GSam Battery Monitor (Free) or BetterBatteryStats ($2.83) and use your phone as usual and it will tell you which apps are consuming the most battery. Various apps “wake up” your phone when it’s trying to sleep, therefore preventing your phone from sleeping for an extended period of time. You have to uninstall those apps if you want decent battery life.

6. Monitor CPU usage
The Nexus 4 CPU’s are clocked at 1.5GHz, but they don’t always run at that speed. The higher the clock speed, the more responsive the system and the more energy it uses. The lower the clock speed, the less responsive the system and the less energy it uses. It’s a balancing act. CPU Spy Plus (free) keeps track of how often your phone is running at what clock speed. Ideally, you would like to see something like below, where the majority of the time, the phone is in “deep sleep” or in the 384MHz zone. The phone uses minimal amount of energy during “deep sleep” and it’s an indicator that nothing is waking it up repeatedly.

7. Disable Autosync
Autosync can use quite a lot of battery life, therefore we’re going to turn off everything in Google, except for Gmail. This way you still get your email pushed to you, but it reduces the numbers of syncs and hopefully some battery. Go through your other “accounts” and decide if you really need them to sync.

8. Use a static wallpaper
We all love live wallpapers, but they use a lot of energy unfortunately. The most battery efficient wallpaper is a static wallpaper. You can use any image or any solid color that you like as the Nexus 4 has an IPS display, so it doesn’t make a difference. If your phone has a Super AMOLED or OLED display (i.e. Galaxy SIII, Galaxy Nexus), it would be beneficial to use a black background as for those types of screens, it takes about 6x less energy to display a black pixel than a white pixel. However, since the Nexus 4 has an IPS display, the wallpaper color makes no difference. (source, source)

9. Uninstall unnecessary apps
Uninstall apps that you don’t need. The more apps you have, the more internet data requests your phone may make, also the more likely one of your apps will wake up your phone from deep sleep. If you haven’t used an app in the last month, uninstall it. Consider uninstalling Facebook, Google+, Whatsap and Skype. Those apps can consume a lot of energy.
 
10. Lock timeout
Set an automatic lock timeout of 15 seconds or less. Go to “Settings”, “Security” then “Automatically Lock”.

11. Disable widgets that you don’t need
The more widgets you have on your screen, the more battery will be consumed. This is especially true for widgets that refresh or fetch data often.

12. Do not use a 3rd party task killers to kill apps
Android is very good at managing resources. You will do more harm than good if you use task killers. Feel free to use the task manager that comes with Android, but avoid using 3rd party task killers (source, source)

13. Upload and sync only on Wi-Fi
If you use Google+ and Dropbox, set it so they only upload files on wifi (instead of cellular data)

14. Turn off sounds
We’ve turned off “Dial Pad Touch Sounds”, ”Touch Sounds”, ”Screen Lock Sounds” and “Sound on keypress”. To get there, go to “Settings” then “Sound” and “Settings” then “Language & Input” then “Android Keyboard”.

15. Turn off Vibrate and Haptic Feedback
Vibration and haptic feedback takes a lot of battery. Therefore, you can consider turning them off. You can turn off “Vibrate on Touch” and  ”Vibrate on keypress”. We’ll leave “Vibrate on notification” and “Vibrate on notification” enabled, but it’s up to you. Go to “Settings” then “Sound” and “Settings” then “Language & Input” then “Android Keyboard”.

16. Install an ad blocking app
There are various apps that can block most ads in Android. I use something called AdFree (free), but a good alternative is AdAway (free) and Adblock Plus. These apps require root access to run. They will update the HOST file in Android, therefore blocking most ads from loading. Less internet requests should mean less battery usage. Google removed all 3 apps from the Google Play store (March 2013), therefore I updated the links to their homepages. You can just “sideload” the apps.

17. Set the date and time manually
This is probably overkill, but you can disable automatic date & time and time zone and set the time, date and time zone yourself in order to reduce internet updates. Go into “Settings” then “Date & time”

18. Turn Android debugging off
The argument goes that by enabling USB debugging, it starts the ADB server daemon and it’s waiting for requests. We’re not sure if there is any negative battery impact by leaving it enabled, but just to make sure, we’ll disable USB debugging. Go into “Settings” then “Developer Options”

19. Turn auto rotate screen off
You can also consider disabling auto-rate. When auto-rotate is enabled, internal sensors are activated to keep track of its angle. You may save some battery by disabling it.

20. Disable location settings
You can disable “Access to my location”, therefore apps won’t be able to use GPS or google’s location services via Wi-fi and cellular towers. If you need to use Google Maps or Navigation, just enable GPS as usual.

21. Install an efficient launcher
Nova Launcher Prime is coded very efficiently and one of the most popular. It can potentially save some battery life. Other alternative launchers can be found.

22. Disable animations
No matter which launcher you’re using, try to disable the scroll effect animations when changing home screens and between app drawer screens. The less animation, the better.

23. Reduce the number of home screens
If you can, reduce the number of home screens. We only have 1 blank home screen.

24. Add a “Go to sleep” button
Add a “Go to sleep” button to your Quick settings panel. Instead of pushing the power button and hoping that the phone goes to sleep, you can direct the phone to go to sleep via the Quick settings panel. To add the button (assuming you’re using CyanogenMod +10.1), go into “Settings”, then “System” then “Quick Settings panel” then “Tiles and layout” then push “+” to add the “Go to sleep” button.

25. Disable backup my data
You can disable “backup up my data” as well. Before you do a factory reset, you should turn this back on in order to resync your data.

26. Log out of Google Talk
Google Talk logs you in by default, therefore it keeps a constant data connection. If you don’t use Google Talk often, sign out.

27. Turn off LED notifications
Some say that the little LED light prevents the phone from sleeping. You can experiment and decide for yourself. Go into “Settings” then “System” then “Notification Light”.

28. Turn off battery life if low.
There’s no reason to have a light blink when your battery is low. The light will only make you drain more battery. Therefore, go into “Settings”, then “System” then “Battery Light”.

29. Disable notifications in Facebook
You should disable Messenger location services (which tells people where you are via GPS when you send someone a facebook message) and you can consider disabling notifications. You won’t receive facebook notifications anymore, but you can still update facebook manually when you’re in the facebook app. A lot of people advise against use the facebook app entirely if one is concerned with battery life and to only use the facebook mobile website, but we think that if you disable messenger location services and notifications, it should be okay to use. In the facebook app, go to “Account” then “App Settings”.

30. Disable Cloud Print and HP Print Service Plugin
By default these options are activated.

31. Install and use Snapdragon BatteryGuru free from Play Store.
Snapdragon BatteryGuru is a battery life saver app that extends battery performance and improves overall user experience by intelligently making changes that optimize device functionality in phones with Snapdragon mobile processors. 
Go in 'Settings' and enable 'Low Power Mode', this option activates when power level goes under 20% and reduce:
- screen brightness
- screen timeout
- stopp app refresh
- disable mobile data
- disable Wi-Fi
- disable Bluetooth
- disable vibrate on touch
Go in 'Apps' tab and choose applications to refresh 'only when you open it'. 

32. Install and use 'Night Mode' app free from Play Store
Use it to put the phone to sleep during a night time interval (ex. from 23:00  to 06:00) and it will:
- disable notification light;
- disable haptic feedback;
- disable notification sounds;
- disable ringtone sounds;
- disable vibration and sounds;
- minimize brightness.


How to repair and revive your Google Nexus 4 - LG E960


Hello everybody.
This article is for owners of Nexus 4 who have had big problems lately with their smartphone.

Symptoms:
- the phone loses signal randomly;
- using camera related apps the phone turns off or reboots;
- using wifi network with weak signal the phone turns off or reboots;
- CPU intensive requests make the phone to turn off or to reboot;
- other issues related with above problems.

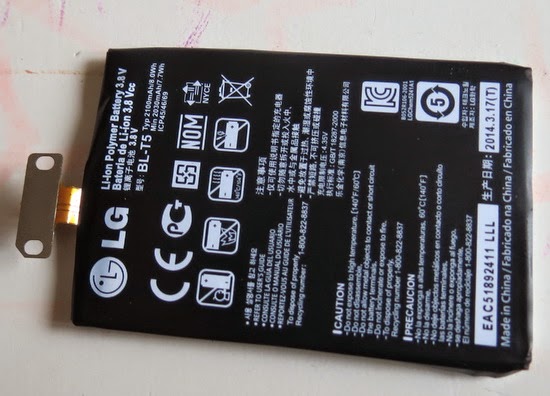
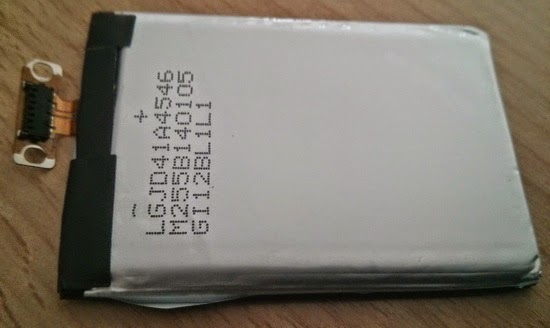
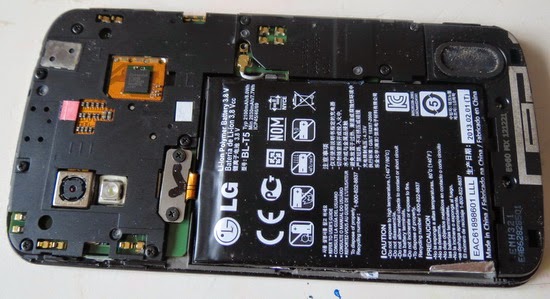
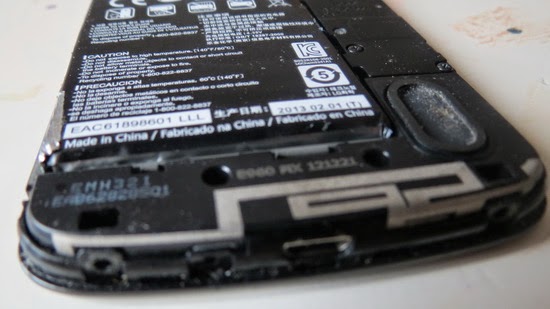
I concluded that all these problems are due to faulty battery the battery life cycle ended and must be replaced. As you see in the image below, the battery was swollen inside the phone, forcing housing to crack open. 


The solution is simple and you can fix Google Nexus 4 yourself, just follow these steps:

1. Buy a high quality replacement battery For LG Google Nexus from Aliexpress.com for only 9.73 USD with free shipping.
2. Follow this tutorial to replace the battery.
3. Follow this tutorial to upgrade your Google Nexus 4 to KitKat 4.4.3 without waiting for OTA Update. You also can unlock and root the phone.
4. If your Nexus 4 is already on KitKat 4.4.3, then unlock and root it with Nexus Root Toolkit 1.8.3 and then calibrate the battery, installing 'Battery Calibration' application, free from Play Store. 
5. Use this tutorial to maximize and optimize battery life on Google Nexus 4 - LG E960.

The new battery


The old swollen battery


Now the phone is working just great, as good as new... 
Enjoy, share is love!

Twitter Delicious Facebook Digg Stumbleupon Favorites More

 
Powered by Blogger