

 11:51 AM
 danyrolux

RockChip released a new flash tool 2.1 which allows you to DUMP entire NAND memory from your RK device. However it is not a fully automated process. It takes some know how to do it. Fortunately I figured it all out for you and will explain below exactly how to do it.
WARNING RIGHT UP FRONT!
I have tested all this on several devices and for me it worked 100%
Tronsmart T428
CX-919
Pipo M9 Pro
Minix X7
But this does not mean you can’t screw up or it ALWAYS works! You are on your own and assume your own risks!
BIG NOTE:
This is really for backing up and restoring. This is NOT for trying to recover from a brick! So only use this if you know how to flash a ROM and have a ROM available you know works already! The reason is this procedure will not be flashing loader or repartitioning NAND! Thus you need a good loader from a good ROM already flashed on your device! In fact to even backup, your device must be working or this will get you no where!
What this really does is replace CWM (ClockWork Mod) in a way. It's faster than CWM and you can backup things CWM does not.
Also what this is totally useful for is to backup a stock ROM! If you do not have a stock ROM available for download for your device, this will back it up! You do not have to backup the user data stuff to be able to flash your stock backed up ROM. :)
Very cool and about time Rockchip!
This tool can dump parts of NAND or everything. But to do everything you still have to back it up in parts! Also, if you want to dump user partition (Internal SDcard) you will have to do a little math! But I will walk you through it so don't be afraid!
With this tool we can dump the stock ROM.
We can dump user space (APP space. accounts, logins, etc called userdata partition). We can dump the internal SDcard (called user partition) We can dump cache, metadata, and ALL other partitions. What you dump is up to you!
It is OPTIONAL to dump internal SDcard! However be aware if you are trying to make a full BACKUP
you probably should do this as many APPs and other user data is stored on Internal SDcard!
I recommend you do this if you are trying to do a full backup and restore everything.
The cool thing here is you can try other ROMs and 100% restore ALL your NAND back to what you had before!
I will break this down into parts:
1) Dumping just the stock ROM. This means no saved user data at all.
Flashing this dump, you will only have a device like new. e.g. it will not save installed APPs, accounts ,settings, etc.
2) After dumping the stock ROM, I will show you how to dump userdata (where APPs are installed, accounts, and settings).
3) After dumping 1&2, I will show you how to dump Internal SDcard and all other partitions for a REAL full NAND backup!
4) Then I will tell you how to flash all this.
We will not be using the 2.1 tool as it has bug flashing userdata (it errors).
Additionally the 2.1 tool will not flash Internal sdcard for some reason (another bug I assume).
Thus for flashing we will use the older flash tool 1.37 which will flash everything with no issues.
OK so let’s get on with the how to and learning. :)
First I want you to know how to use your PC Windows Calculator (built in windows! Find it in your start menu).
We will have to do some math in hex to dump internal SDcard so I want to show you "programmer mode".
Run the windows calculator and in the view menu change it to "programmer" mode.
Please notice on the left you can now select Dec for decimal numbers, and Hex for Hexadecimal numbers.
We will be using the calculator in Hex mode a lot!
Now have that up so we can use it when needed and leave it open.
Again this calculator is needed ONLY to dump internal SDcard.
Learning things first (optional).
All this is OPTIONAL for you to learn. If you don’t want to learn it then move on down to the instructions!
Understanding NAND layout:
Your NAND chips is broken into "partitions" or parts if you will call it that.
Each one of these servers a purpose. Here are all the partitions of a RockChip ROM.
Loader.bin - this is low in NAND and special. You can flash it but cannot dump it.
parameter - this file tells the loader how NAND memory is split up into partitions.
misc.img - this is a special area that tells the recovery system what to do on boot.
boot.img - this is the boot section and basically is the ram disk the kernel uses to boot.
kernel.img - this is of course the kernel.
cache.img - this is an area APPs store information like Google Play for instance.
kpanic.img - this is a special area for use by the kernel.
metadata.img - this is a NEW area for KitKat only. It does not exist in pre-kitkat ROMs. It's used for Encryption.
recovery.img - this is like boot.img but boots the recovery menu system.
system.img - this is the system OS.
backup.img - I am not sure what this is. It started showing up with Rockchip ROMs but does not appear to do anything.
But it might be work backing up anyway.
userdata.img - this is where APPs get installed, user accounts are stored, databases, etc. This area if erased losses all your user installed apps, settings, etc. A factory data reset erases this area.
user.img - This is the remaining NAND space and is set aside as the Internal SDcard.
Please note, many APPs like games, etc store stuff here! Erasing this you can lose data! This is also erased on a factory reset.
So based on the above what parts are a stock ROM?
Loader.bin
parameter
boot.img
kernel.img
misc.img
recovery.img
system.img
As you can see a stock ROM is just that! No user data!
Erasing NAND with the flash tool and flashing a stock ROM gives you a empty like new device as if you just bought it.
OK so some basics there. Now let’s look at the parameter file.
It's important because we will be using this to DUMP NAND memory.
I do not need to make you an expert on this but you need to know a few things.
If we look at this area of a parameter file, you will see the partitions I listed above!
Both the ones that hold a stock ROM images as well as ones that are created to be used by the system.
So what do those number mean in from of each partition name like boot for instance?
First all these numbers are in hex. Second the numbers are blocks of 512 bytes!
let's look at boot..
0x00006000@0x0000a000(boot)
The first number 0x00006000 is the size of the partition.
The second number 0x0000a000 is the offset into the NAND chip from 0 location (start of the NAND chip).
But remember all these numbers are in 512 blocks.
If you wanted to know the size in bytes then do this math in your PC calculator.
REMEMBER to have the calculator set to HEX!!!
Enter 6000 and now multiply by 200 (fyi 200 hex is 512 decimal).
You will get C00000. Want to see that it decimal? In the calculator just click Dec and it will convert it!
So what we have is 12,582,912 bytes! Basically that is 12 megabytes.
Alright you can do that same math if you wanted to know the offset into NAND in decimal bytes.
Why is all this important? Well if gets you up to speed later when we calculate internal SDcard.
You don't need to know this but it might help you understand if you were to do things on your own.
Instructions for dumping....
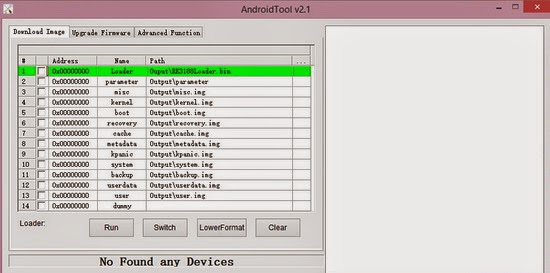
Before we begin let’s get familiar with the tool.
In the download run the ROM_Dumper_Tool.exe.
When it opens you will notice 3 tabs at the top.
Download image - this is for flashing ROMs
Upgrade Firmware - this is for lashing single .img ROMs. I won’t be going into this area for as we don’t use it for dumping.
Advanced Function - This is for dumping and doing some cool stuff! We will be in here all the time for this procedure.
Note: Anytime we dump a partition the tool always makes a file called ExportImage.img in a folder called Ouptut.
So every time we dump a different partition it will overwrite that file unless we rename them first!
Don't forget that please.
OK first lets dump the basic flashable ROM:
To do ANY dumping we need to dump the parameter file of the ROM from NAND.
Why? because we need the start (offset) and count (size) of the partition or we can’t dump anything.
1) Click the advance functions tab.
2) At the bottom is the "export image" button and to empty boxes, Start and Count.
3) To get the parameter file put a 0 in the start box and a 2 in the count.
4) Now press the export image button.
5) Now we need to make this a real parameter file! Rename the file to parameter.txt
6) We need to clean it up a bit. Open in Windows note pad ONLY!!! Do not open in MS word or anything else or it won’t work!
Also you may need to turn on word wrap to see everything (format menu, select word wrap checked).
7) The first line you will see something like this:
PARMi FIRMWARE_VER:4.1.1
Delete all the junk in front of the word FIRMWARE so it looks like this now:
FIRMWARE_VER:4.1.1
8) clean up ending junk. At the end you will see this word:
(user)
After it will be some junk. Delete everything after (user) including any blank space.
When done make sure to hit enter once so there is a new line after (user)
9) Save the cleaned up parameter file but leave it open as we need it to continue.
Now let’s start dumping!
We will do system.img to start with as an example.
1) Look at the parameter file and find (system) and the numbers before it. Example:
0x00180000@0x00484000(system)
REMEMBER the number before @ is the COUNT and the number after the @ is the START!
2) Copy the number after the @ example: 0x00484000 into the start box of the advanced tab in the tool.
3) Copy the number before the @ example: 0x00180000 into the count box of the advanced tab in the tool.
4) Press the export image button and wait for it to complete.
5) Go into the Output folder and rename the file ExportImage.ing to system.img
Now we just repeat the steps 1-5 above for
misc.img
kernel.img
boot.img
recovery.img
backup.img (This can be optional but do it anyway especially if this is a first REAL stock ROM dump as we may need it).
Remember to always use the numbers in front of each name! Don't forget to change those or you won’t have a good dump.
Also remember after each dump, to rename ExportImage.img to the proper name of the image you dumped!
Each time you press Export Image, it will overwrite the existing ExportImage file unless you rename it!
When you’re done you should have the basic ROM dump.
misc.img, kernel.img, boot.img, recovery.img, system.img, and backup.img.
You can now use the flash tool 2.1 or the flash tool 1.37 to flash these.
Dumping userdata, cache, metadata, kpanic:
For a user backup the above 4 should be dumped.
We will start with userdata
This is basically the same as above except can take longer depending on how big your user data partition is.
This will be larger than any other partition so far as most devices have at least 1GB or more!
1) Again look at the parameter file and find (userdata) and the numbers before it. Example:
0x00400000@0x00080000(userdata)
REMEMBER the number before @ is the COUNT and the number after the @ is the START!
2) Copy the number after the @ example: 0x00080000 into the start box of the advanced tab in the tool.
3) Copy the number before the @ example: 0x00400000 into the count box of the advanced tab in the tool.
4) Press the export image button and wait for it to complete.
5) Go into the Output folder and rename the file ExportImage.ing to userdata.img
Again repeat above for cache, kpanic, metadata.
if your parameter file does not have metadata then no need to dump this as it does not exist.
Remember only KitKat ROMs have this so do not worry if you don’t have it.
Finally to the hardest part but it is not really that hard. Dumping "user" which is internal SDcard.
Note: if you have a 32GB NAND or something large like that, this might not be worth your time!
Just back up internal SDcard another way (file copy) as it will probably be faster.
One way I like to do it is turn on MASS Storage in settings and enable USB to the PC.
Then I just copy the files to the PC.
For restore after flashing a ROM and userdata, I do the same thing and copy the files back to internal sd BEFORE running any apps that need that data on internal SDcard!
Dumping 32GB and flashing a large internal SDcard takes a LONG TIME! If most of your internal SDcard is empty,
dumping and flashing still writes ALL 32GB anyway so it's a waste of time to do this unless you have a LOT on internal SD.
So there is a trade-off... YOU decide which best works for you!
However for my TV sticks with a total of 8GB NAND, I use this process as it saves time and is 100%.
*********
So to back this area up we have to work some things out.
You will notice the parameter file for (user) has no SIZE number just the offset!
Example: -@0x00604000(user)
the -@ simply says to use the remaining NAND as all of user (internal SDcard).
Thus to dump it we must calculate the size! To do this we must know how big our NAND chip is.
First put the number after the @ into the start box so we don't forget example: 0x00604000
This is just like the other parts we did above. We need the start point for user (internal SDcard).
Now let’s find out the size of the NAND chip.
In the advanced tab click the Read Flash Info button.
On the right it will display information but we are interested in this:
Flash Size: XXXXX MB
Where XXXXX is the size of your flash chip "page" size.
For instance my Pipo M9 Pro says 8192 MB.
BUT WAIT! We also have to see how many pages of NAND we have.
Look at the line Flash CS:
If yours has a 0 then that is all you have 8GB
If CS says something like 0 1 2 3 (That’s 4 pages)
Then you have 4 pages of 8GB or 32GB NAND. If it says 0 1 then you have 2 pages or 16GB NAND and so on.
So whatever your size is multiple that by number of pages!
Example my Tronsmart T428 TV stick says:
Flash Size 8528 MB
Flash CS: 0
Thus my full NAND size is 8528 as there is only 1 page
(yes the 0 is a page! The first page starts at 0 and a 1 is the 2nd page).
My Pipo M9 Pro says this:
Flash Size 8192 MB
Flash CS: 0 1 2 3
Thus I would take 8192 and multiply by 4 pages = 32768 MB NAND size.
So we now have our total NAND size!
Now a little more math but easy if you follow my instructions.
First we must make the size in MB a REAL GB number (not a MB number in 1000's).
I am going to use 8192 MB (8GB) NAND as an example. (It only had 1 page e.g. Flash CS: 0)
1) Open your PC calculator and again make sure it is set to programmer mode!
2) Make sure your set to Dec (decimal) not Hex mode!!!
2) Type in your NAND size you read or calculated with pages from the tool. My example 8192.
3) Multiply that by 1024. My example 8192 x 1024 = 8388608
4) Now do that one more time and multiply 8388608 by 1024. My example 8388608 x 1024 = 8589934592
5) Now divide this number by 512. My example 8589934592 / 512 = 16777216
So you know what all this math did was take the proper number of bytes and divide them into 512 blocks.
This is what is needed by the flash tool and parameter file!
6) Now press the Hex button on the left of the calculator to convert this to a hex number. My example came to 1000000 Hex.
7) OK now we know the total size of our NAND chip in 512 byte blocks in Hex format!
8) Now take this number and subtract the "start" that what was shown in the parameter file.
In my example parameter file I had -@0x00604000(user) so my start is 604000 (we don’t use the beginning 0's).
So again my example 1000000 - 604000 = 9FC000
We now have our user (internal SDcard) size! It is 9FC000 in hex!!!
9) Enter this number into the count box of the tool. Again my example is 9FC000
BUT we need to enter it in the format the tool needs and that is hex!
Just add the 0x at beginning of the number so the tool knows it's hex. Again my example is now 0x9FC000
Just a note: 0's in front of any hex number are ignored. So 0x009fc000 is the same as 0x9fc000.
10) Make sure as I said above, you also entered the start number! Again in my example 0x00604000
11) Press the export image button and wait for it to finish. Depending on size this could be a long time!
12) Done forget to rename the ExpoertImage.img to user.img!
We are DONE! We now have a flashable FULL backup of the entire NAND chip!
What you should have in the output folder, if you did everything above dumping EVERYTHING is:
parameter.txt
backup.img
boot.img
cache.img
kernel.img
kpanic.img
metadata.img (optional if you had that and were on KitKat)
misc.img
recovery.img
system.img
user.img (internal SDcard)
userdata.img
Flashing your dump:
OK so now you have dumped the ROM and other items and you want to flash them back.
Well we can’t use the 2.1 RK tool! Why? Because it has 2 bugs in it.
1) Flashing userdata. It works but will error at 50% every time.
It actually does flash 100% but due to a math bug in the program it counts to 50% instead of 100%.
2) It won’t flash user (internal SD). If you try it says it did it but it doesn’t.
It returns success instantly so obviously it doesn’t flash anything.
If you did not backup user (Internal SD) then feel free to flash with the 2.1 tool and you will be OK even with the error at 50%.
However I setup the old 1.37 flash tool for you. All of the lines for each image is there.
I even have them checked by default for you.
In the download there is a flasher tool folder. Just run the flash tool from there.
Uncheck anything you didn’t backup or items you don’t want to flash.
Note: if you leave something checked you did not backup or the .img is not in the Output folder, you will get an error.
I left boot loader unchecked as there is no reason to flash that!
OK so that’s it!
Enjoy this cool new way to backup :)
All credits for this tutorial go to Finless Bob
WARNING RIGHT UP FRONT!
I have tested all this on several devices and for me it worked 100%
Tronsmart T428
CX-919
Pipo M9 Pro
Minix X7
But this does not mean you can’t screw up or it ALWAYS works! You are on your own and assume your own risks!
BIG NOTE:
This is really for backing up and restoring. This is NOT for trying to recover from a brick! So only use this if you know how to flash a ROM and have a ROM available you know works already! The reason is this procedure will not be flashing loader or repartitioning NAND! Thus you need a good loader from a good ROM already flashed on your device! In fact to even backup, your device must be working or this will get you no where!
What this really does is replace CWM (ClockWork Mod) in a way. It's faster than CWM and you can backup things CWM does not.
Also what this is totally useful for is to backup a stock ROM! If you do not have a stock ROM available for download for your device, this will back it up! You do not have to backup the user data stuff to be able to flash your stock backed up ROM. :)
Very cool and about time Rockchip!
This tool can dump parts of NAND or everything. But to do everything you still have to back it up in parts! Also, if you want to dump user partition (Internal SDcard) you will have to do a little math! But I will walk you through it so don't be afraid!
With this tool we can dump the stock ROM.
We can dump user space (APP space. accounts, logins, etc called userdata partition). We can dump the internal SDcard (called user partition) We can dump cache, metadata, and ALL other partitions. What you dump is up to you!
It is OPTIONAL to dump internal SDcard! However be aware if you are trying to make a full BACKUP
you probably should do this as many APPs and other user data is stored on Internal SDcard!
I recommend you do this if you are trying to do a full backup and restore everything.
The cool thing here is you can try other ROMs and 100% restore ALL your NAND back to what you had before!
I will break this down into parts:
1) Dumping just the stock ROM. This means no saved user data at all.
Flashing this dump, you will only have a device like new. e.g. it will not save installed APPs, accounts ,settings, etc.
2) After dumping the stock ROM, I will show you how to dump userdata (where APPs are installed, accounts, and settings).
3) After dumping 1&2, I will show you how to dump Internal SDcard and all other partitions for a REAL full NAND backup!
4) Then I will tell you how to flash all this.
We will not be using the 2.1 tool as it has bug flashing userdata (it errors).
Additionally the 2.1 tool will not flash Internal sdcard for some reason (another bug I assume).
Thus for flashing we will use the older flash tool 1.37 which will flash everything with no issues.
OK so let’s get on with the how to and learning. :)
First I want you to know how to use your PC Windows Calculator (built in windows! Find it in your start menu).
We will have to do some math in hex to dump internal SDcard so I want to show you "programmer mode".
Run the windows calculator and in the view menu change it to "programmer" mode.
Please notice on the left you can now select Dec for decimal numbers, and Hex for Hexadecimal numbers.
We will be using the calculator in Hex mode a lot!
Now have that up so we can use it when needed and leave it open.
Again this calculator is needed ONLY to dump internal SDcard.
Learning things first (optional).
All this is OPTIONAL for you to learn. If you don’t want to learn it then move on down to the instructions!
Understanding NAND layout:
Your NAND chips is broken into "partitions" or parts if you will call it that.
Each one of these servers a purpose. Here are all the partitions of a RockChip ROM.
Loader.bin - this is low in NAND and special. You can flash it but cannot dump it.
parameter - this file tells the loader how NAND memory is split up into partitions.
misc.img - this is a special area that tells the recovery system what to do on boot.
boot.img - this is the boot section and basically is the ram disk the kernel uses to boot.
kernel.img - this is of course the kernel.
cache.img - this is an area APPs store information like Google Play for instance.
kpanic.img - this is a special area for use by the kernel.
metadata.img - this is a NEW area for KitKat only. It does not exist in pre-kitkat ROMs. It's used for Encryption.
recovery.img - this is like boot.img but boots the recovery menu system.
system.img - this is the system OS.
backup.img - I am not sure what this is. It started showing up with Rockchip ROMs but does not appear to do anything.
But it might be work backing up anyway.
userdata.img - this is where APPs get installed, user accounts are stored, databases, etc. This area if erased losses all your user installed apps, settings, etc. A factory data reset erases this area.
user.img - This is the remaining NAND space and is set aside as the Internal SDcard.
Please note, many APPs like games, etc store stuff here! Erasing this you can lose data! This is also erased on a factory reset.
So based on the above what parts are a stock ROM?
Loader.bin
parameter
boot.img
kernel.img
misc.img
recovery.img
system.img
As you can see a stock ROM is just that! No user data!
Erasing NAND with the flash tool and flashing a stock ROM gives you a empty like new device as if you just bought it.
OK so some basics there. Now let’s look at the parameter file.
It's important because we will be using this to DUMP NAND memory.
I do not need to make you an expert on this but you need to know a few things.
If we look at this area of a parameter file, you will see the partitions I listed above!
Both the ones that hold a stock ROM images as well as ones that are created to be used by the system.
So what do those number mean in from of each partition name like boot for instance?
First all these numbers are in hex. Second the numbers are blocks of 512 bytes!
let's look at boot..
0x00006000@0x0000a000(boot)
The first number 0x00006000 is the size of the partition.
The second number 0x0000a000 is the offset into the NAND chip from 0 location (start of the NAND chip).
But remember all these numbers are in 512 blocks.
If you wanted to know the size in bytes then do this math in your PC calculator.
REMEMBER to have the calculator set to HEX!!!
Enter 6000 and now multiply by 200 (fyi 200 hex is 512 decimal).
You will get C00000. Want to see that it decimal? In the calculator just click Dec and it will convert it!
So what we have is 12,582,912 bytes! Basically that is 12 megabytes.
Alright you can do that same math if you wanted to know the offset into NAND in decimal bytes.
Why is all this important? Well if gets you up to speed later when we calculate internal SDcard.
You don't need to know this but it might help you understand if you were to do things on your own.
Instructions for dumping....
Before we begin let’s get familiar with the tool.
In the download run the ROM_Dumper_Tool.exe.
When it opens you will notice 3 tabs at the top.
Download image - this is for flashing ROMs
Upgrade Firmware - this is for lashing single .img ROMs. I won’t be going into this area for as we don’t use it for dumping.
Advanced Function - This is for dumping and doing some cool stuff! We will be in here all the time for this procedure.
Note: Anytime we dump a partition the tool always makes a file called ExportImage.img in a folder called Ouptut.
So every time we dump a different partition it will overwrite that file unless we rename them first!
Don't forget that please.
OK first lets dump the basic flashable ROM:
To do ANY dumping we need to dump the parameter file of the ROM from NAND.
Why? because we need the start (offset) and count (size) of the partition or we can’t dump anything.
1) Click the advance functions tab.
2) At the bottom is the "export image" button and to empty boxes, Start and Count.
3) To get the parameter file put a 0 in the start box and a 2 in the count.
4) Now press the export image button.
5) Now we need to make this a real parameter file! Rename the file to parameter.txt
6) We need to clean it up a bit. Open in Windows note pad ONLY!!! Do not open in MS word or anything else or it won’t work!
Also you may need to turn on word wrap to see everything (format menu, select word wrap checked).
7) The first line you will see something like this:
PARMi FIRMWARE_VER:4.1.1
Delete all the junk in front of the word FIRMWARE so it looks like this now:
FIRMWARE_VER:4.1.1
8) clean up ending junk. At the end you will see this word:
(user)
After it will be some junk. Delete everything after (user) including any blank space.
When done make sure to hit enter once so there is a new line after (user)
9) Save the cleaned up parameter file but leave it open as we need it to continue.
Now let’s start dumping!
We will do system.img to start with as an example.
1) Look at the parameter file and find (system) and the numbers before it. Example:
0x00180000@0x00484000(system)
REMEMBER the number before @ is the COUNT and the number after the @ is the START!
2) Copy the number after the @ example: 0x00484000 into the start box of the advanced tab in the tool.
3) Copy the number before the @ example: 0x00180000 into the count box of the advanced tab in the tool.
4) Press the export image button and wait for it to complete.
5) Go into the Output folder and rename the file ExportImage.ing to system.img
Now we just repeat the steps 1-5 above for
misc.img
kernel.img
boot.img
recovery.img
backup.img (This can be optional but do it anyway especially if this is a first REAL stock ROM dump as we may need it).
Remember to always use the numbers in front of each name! Don't forget to change those or you won’t have a good dump.
Also remember after each dump, to rename ExportImage.img to the proper name of the image you dumped!
Each time you press Export Image, it will overwrite the existing ExportImage file unless you rename it!
When you’re done you should have the basic ROM dump.
misc.img, kernel.img, boot.img, recovery.img, system.img, and backup.img.
You can now use the flash tool 2.1 or the flash tool 1.37 to flash these.
Dumping userdata, cache, metadata, kpanic:
For a user backup the above 4 should be dumped.
We will start with userdata
This is basically the same as above except can take longer depending on how big your user data partition is.
This will be larger than any other partition so far as most devices have at least 1GB or more!
1) Again look at the parameter file and find (userdata) and the numbers before it. Example:
0x00400000@0x00080000(userdata)
REMEMBER the number before @ is the COUNT and the number after the @ is the START!
2) Copy the number after the @ example: 0x00080000 into the start box of the advanced tab in the tool.
3) Copy the number before the @ example: 0x00400000 into the count box of the advanced tab in the tool.
4) Press the export image button and wait for it to complete.
5) Go into the Output folder and rename the file ExportImage.ing to userdata.img
Again repeat above for cache, kpanic, metadata.
if your parameter file does not have metadata then no need to dump this as it does not exist.
Remember only KitKat ROMs have this so do not worry if you don’t have it.
Finally to the hardest part but it is not really that hard. Dumping "user" which is internal SDcard.
Note: if you have a 32GB NAND or something large like that, this might not be worth your time!
Just back up internal SDcard another way (file copy) as it will probably be faster.
One way I like to do it is turn on MASS Storage in settings and enable USB to the PC.
Then I just copy the files to the PC.
For restore after flashing a ROM and userdata, I do the same thing and copy the files back to internal sd BEFORE running any apps that need that data on internal SDcard!
Dumping 32GB and flashing a large internal SDcard takes a LONG TIME! If most of your internal SDcard is empty,
dumping and flashing still writes ALL 32GB anyway so it's a waste of time to do this unless you have a LOT on internal SD.
So there is a trade-off... YOU decide which best works for you!
However for my TV sticks with a total of 8GB NAND, I use this process as it saves time and is 100%.
*********
So to back this area up we have to work some things out.
You will notice the parameter file for (user) has no SIZE number just the offset!
Example: -@0x00604000(user)
the -@ simply says to use the remaining NAND as all of user (internal SDcard).
Thus to dump it we must calculate the size! To do this we must know how big our NAND chip is.
First put the number after the @ into the start box so we don't forget example: 0x00604000
This is just like the other parts we did above. We need the start point for user (internal SDcard).
Now let’s find out the size of the NAND chip.
In the advanced tab click the Read Flash Info button.
On the right it will display information but we are interested in this:
Flash Size: XXXXX MB
Where XXXXX is the size of your flash chip "page" size.
For instance my Pipo M9 Pro says 8192 MB.
BUT WAIT! We also have to see how many pages of NAND we have.
Look at the line Flash CS:
If yours has a 0 then that is all you have 8GB
If CS says something like 0 1 2 3 (That’s 4 pages)
Then you have 4 pages of 8GB or 32GB NAND. If it says 0 1 then you have 2 pages or 16GB NAND and so on.
So whatever your size is multiple that by number of pages!
Example my Tronsmart T428 TV stick says:
Flash Size 8528 MB
Flash CS: 0
Thus my full NAND size is 8528 as there is only 1 page
(yes the 0 is a page! The first page starts at 0 and a 1 is the 2nd page).
My Pipo M9 Pro says this:
Flash Size 8192 MB
Flash CS: 0 1 2 3
Thus I would take 8192 and multiply by 4 pages = 32768 MB NAND size.
So we now have our total NAND size!
Now a little more math but easy if you follow my instructions.
First we must make the size in MB a REAL GB number (not a MB number in 1000's).
I am going to use 8192 MB (8GB) NAND as an example. (It only had 1 page e.g. Flash CS: 0)
1) Open your PC calculator and again make sure it is set to programmer mode!
2) Make sure your set to Dec (decimal) not Hex mode!!!
2) Type in your NAND size you read or calculated with pages from the tool. My example 8192.
3) Multiply that by 1024. My example 8192 x 1024 = 8388608
4) Now do that one more time and multiply 8388608 by 1024. My example 8388608 x 1024 = 8589934592
5) Now divide this number by 512. My example 8589934592 / 512 = 16777216
So you know what all this math did was take the proper number of bytes and divide them into 512 blocks.
This is what is needed by the flash tool and parameter file!
6) Now press the Hex button on the left of the calculator to convert this to a hex number. My example came to 1000000 Hex.
7) OK now we know the total size of our NAND chip in 512 byte blocks in Hex format!
8) Now take this number and subtract the "start" that what was shown in the parameter file.
In my example parameter file I had -@0x00604000(user) so my start is 604000 (we don’t use the beginning 0's).
So again my example 1000000 - 604000 = 9FC000
We now have our user (internal SDcard) size! It is 9FC000 in hex!!!
9) Enter this number into the count box of the tool. Again my example is 9FC000
BUT we need to enter it in the format the tool needs and that is hex!
Just add the 0x at beginning of the number so the tool knows it's hex. Again my example is now 0x9FC000
Just a note: 0's in front of any hex number are ignored. So 0x009fc000 is the same as 0x9fc000.
10) Make sure as I said above, you also entered the start number! Again in my example 0x00604000
11) Press the export image button and wait for it to finish. Depending on size this could be a long time!
12) Done forget to rename the ExpoertImage.img to user.img!
We are DONE! We now have a flashable FULL backup of the entire NAND chip!
What you should have in the output folder, if you did everything above dumping EVERYTHING is:
parameter.txt
backup.img
boot.img
cache.img
kernel.img
kpanic.img
metadata.img (optional if you had that and were on KitKat)
misc.img
recovery.img
system.img
user.img (internal SDcard)
userdata.img
Flashing your dump:
OK so now you have dumped the ROM and other items and you want to flash them back.
Well we can’t use the 2.1 RK tool! Why? Because it has 2 bugs in it.
1) Flashing userdata. It works but will error at 50% every time.
It actually does flash 100% but due to a math bug in the program it counts to 50% instead of 100%.
2) It won’t flash user (internal SD). If you try it says it did it but it doesn’t.
It returns success instantly so obviously it doesn’t flash anything.
If you did not backup user (Internal SD) then feel free to flash with the 2.1 tool and you will be OK even with the error at 50%.
However I setup the old 1.37 flash tool for you. All of the lines for each image is there.
I even have them checked by default for you.
In the download there is a flasher tool folder. Just run the flash tool from there.
Uncheck anything you didn’t backup or items you don’t want to flash.
Note: if you leave something checked you did not backup or the .img is not in the Output folder, you will get an error.
I left boot loader unchecked as there is no reason to flash that!
OK so that’s it!
Enjoy this cool new way to backup :)
All credits for this tutorial go to Finless Bob
1 comentarii:
...Rockchip has actually updated their tool to Android Tool v. 2.3. Bob Finless actually wrote his tutorial some time ago; download the updated tool here:
https://mega.co.nz/#!nFwjXLZa!EqRJNXfV5Va3tIiRhj-Ps1M7l8c4WXaZRRR9wiU3U6w
Post a Comment